Design your Electrical System in 10 minutes
Build safe, custom 12V or 24V systems for your camper, boat, 4×4, overlander or off-grid cabin, without technical knowledge or risk.
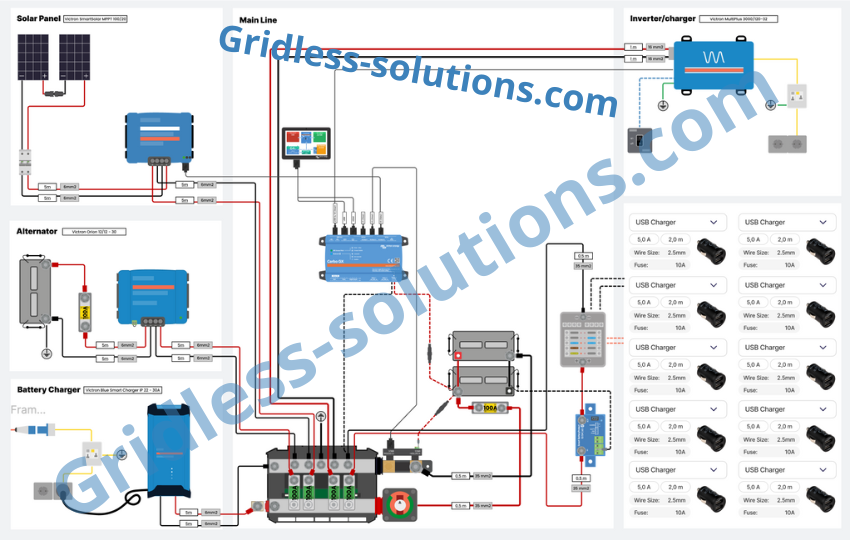
Design your off-grid electrical system in minutes instead of days.
- No more guess work
- Automatic wire & fuse sizing
- Clear overview of all connections
- 12V & 24V system voltage
- 240V | 230V | 220V | 120V
- metric or imperial: mm²/meters or AWG/feet
- Translated in: Deutsch, Français, Español, Italiano, Nederlands, Português, Polski
€49
Trusted by over 1000 DIY builders across Europe & beyond


Skip the forums and guesswork. Generate your custom wiring diagram in under 10 minutes.
1. Full acces to our software (valued at €150,-)
Plan unlimited systems with automatic circuit logic, fuse sizing, and cable calculations. Save 6–8 hours of research and design.
Instant access right after signup.
Full Shopping list (valued at €35,-)*
Save up to 4 hours of searching with a clear overview of every part you’ve selected — including clickable links to high-quality, trusted suppliers only.
Includes a dedicated fuse and wire section: instantly see what size and length of wire you need, and which fuses to use.
*We’re still optimising the shoppinglist!
Complete Wiring Guide eBook (valued at €27)
Learn the basics of 12V and 24V systems, cable sizing, fuse selection, and common setup mistakes — in simple, beginner-friendly language.
A perfect companion to your wiring diagram. Use it offline or print it for your own project.

Ongoing Updates & Support (valued at €70)
We are constantly working on improving our software. Updates are included for the length of your license. So see what we are working on, check out the roadmap.
Have a question? We’re here to help! We aim to reply to any question within 24 hours.
Our offer 🍀
After signing up, you’ll receive an email with a link to create your account. After that, you can start building right away!
Wiring Diagram Software
Your DIY Wiring Shortcut: All essential tools you need in one package:
€282
€49
- Full access to our software (valued at €150)
- Full shopping list with high-quality links (valued at €35)
- Complete eBook (valued at €27)
- Ongoing updates and personal support (valued at €70)
Built for builders. Trusted by 1000+ across the world.
Building a safe and reliable off-grid electrical system is hard, especially if it’s your first time. Most people spend 20+ hours searching forums, comparing wire sizes, and second-guessing every decision. And even then, they’re not sure if it’s right.
Our Software is built differently.
It’s not just a drawing tool. It’s your system logic, safety check, and planning guide, all in one place.
What makes it work so well?
User-friendly, intuitive interface – built for beginners and professionals
Wire and fuse sizing done for you – no more guesswork
Clear diagram with all connections shown
Compatible with 12V & 24V DC setups
Supports AC inputs and outputs: 120V & 230V
Choose metric or imperial: mm²/meters or AWG/feet
Auto-generated shopping list – every part listed and linked (Beta*)
Saves countless hours of research, calculation and design work

About us
We started Camper-Elektra.com in 2021 to help vanlifers in the Netherlands build safe and reliable electrical systems. Since then, our platform has supported thousands of DIYers with clear, custom wiring diagrams. We’ve seen how challenging it can be to design a safe setup — that’s why we developed easy-to-use software that takes the guesswork out of van electrics.
Watch how easy it is to build your custom wiring diagram
Designed for Safety and Simplicity
Our software was designed for safety and simplicity. By combining the industry’s most-used components from Victron and Ective, users can create over 250,000 unique, error-free configurations. All automatically checked for compatibility with correct Fues and wire sizes.
Note: professional license not yet available. Contact us for more information.
Still have questions? We’ve got answers.
We’ve helped thousands of DIYers build safe electrical systems, and many had the same questions you might have right now. Below you’ll find clear answers to the most common ones.
FAQ
Our software is designed for DIY builders who want to create a safe and reliable off-grid electrical system, whether it’s for a camper, boat, 4×4, truck, overlander or tiny home. Perfect for beginners, but accurate enough for semi-pros.
That depends on the licence. As of this moment we have a 365 licence and a lifetime licence. Both licences require a one time payment. The 365 licence does not automatically renew.
English
Dutch
French
Spanish
Portugese
Polish
As often as you want. During your active subscription, you can generate unlimited systems.
No, not necessarily, but some basic knowledge is welcome of course. If you read our eBook, you’ll have a good base to start with. (complementary with the purchase of a licence)
The software is designed so that you can’t make a mistake.
Our software works best on a computer, but it’s also fully functional on a tablet.
You can use it on a phone as well, though the experience may be less optimal.
Our software guides you through a step-by-step process. You select the components you need, and it automatically handles wiring logic, fuse ratings, cable sizing, and more. The software is made so that you can’t make a mistake or select a combination that is not logical.
The software calculates wire size based on current, voltage, and wire length. We follow accepted engineering standards, and where available, we use official manufacturer guidelines to determine correct cable size.
Both metric (mm²/meters) and imperial (AWG/feet) units are supported.
For most inverter/chargers we try to use manufacturers standards. When they’re not available we maintain a maximum voltage drop of 2%. For general 12V or 24V appliances like USB outlets and lighting, we allow up to 6%.
Fuses are automatically sized based on the maximum current the wire can safely handle, including an allowed voltage drop and a built-in safety margin. Whenever possible, we also follow the specifications provided in the manufacturer’s manual.
No. Our software is designed for so-called drop-in batteries with an internal BMS, or for lead-acid based batteries. We may add support for external BMS configurations in the future, but this is not possible at the moment.
Inverters – 230V
12V
-
250VA
-
375VA
-
500VA / 500W
-
800VA
-
1000W
-
1200VA
-
1500W
-
1600VA
-
2000W / 2000VA
-
2500W
-
3000VA / 3000W
24V
-
250VA
-
375VA
-
500VA / 500W
-
800VA
-
1000W
-
1200VA
-
1500W
-
1600VA
-
2000W / 2000VA
-
2500W
-
3000VA / 3000W
Victron MultiPlus – 230V
12V
-
MultiPlus 12/500/35
-
MultiPlus 12/800/35
-
MultiPlus 12/1200/50
-
MultiPlus 12/1600/70
-
MultiPlus II 12/2000/80
-
MultiPlus II 12/3000/120-32
24V
-
MultiPlus 24/500/10
-
MultiPlus 24/800/16
-
MultiPlus 24/1200/25
-
MultiPlus 24/1600/40
-
MultiPlus II 24/2000/50
-
MultiPlus II 24/3000/70-32
-
MultiPlus II 24/5000/120-50
Ective Inverters – CSI Serie
12V (230V)
-
CSI 3, 5, 10, 15, 20, 25, 30
24V (230V)
-
CSI 5, 10, 15, 20, 25, 30
12V – CSI PRO
-
PRO 10, 15, 20, 25, 30
Ective Inverters – SSI Serie
12V (230V)
-
SSI 10, 15, 20, 25, 30
24V (230V)
-
SSI 10, 15, 20, 25, 30
12V – SSI PRO
-
PRO 10, 15, 20, 25, 30
Inverters – 120V
12V → 120V
-
250VA
-
375VA
-
500VA / 500W
-
800VA
-
1000W
-
1200VA
-
1500W
-
2000W
-
2500W
-
3000W
24V → 120V
-
250VA
-
375VA
-
500VA / 500W
-
800VA
-
1000W
-
1200VA
-
1500W
-
2000W
-
2500W
-
3000W
Victron MultiPlus – 120V
12V
-
MultiPlus Compact 12/2000/80
-
MultiPlus II 12/3000/120-32
24V
-
MultiPlus II 24/2000/50
-
MultiPlus II 24/3000/70-32
-
MultiPlus II 24/5000/120-50
Yes, you can choose between parallel and series-parallel setups. You can select up to 5 solar panels.
Yes, our software allows you to choose both your alternator voltage and your system voltage. You can select either 12V or 24V for each, depending on your setup. This gives you the flexibility to match your electrical system to your specific vehicle and components.
Yes, our software supports both 120V and 230V systems. If your mains voltage is 220V or 240V, you can simply select 230V in the software, this will work just fine. These voltages are close enough that they don’t impact how your setup functions.
Our software is compatible with a wide range of devices, including inverters, batteries, solar charge controllers, and more. For the full and up-to-date list, please visit our dedicated Compatible Devices page.
€69 for a year (365) licence and €199 for a lifetime licence. You get instant access and can build unlimited systems during your subscription. Updates are included in the licences.
You’ll receive an email with login instructions. From there, you can start building your first diagram in minutes.
Yes. Once your signup is complete, you’re ready to go. It sometimes happens that our onboarding email ends up in the spam folders, so please do check that.
You can not cancel a subscription. It’s a one time payment without automatic renewal. Naturally a lifetime licenses doesn’t need cancelation.
Because full access is granted immediately, we don’t offer refunds. But if you run into issues, just contact us — we’ll do our best to fix it.
We’re currently building a professional license for installers and businesses who want to create branded diagrams for their customers. Want early access? Let us know.
No, not yet. The current version is for personal use only. Our B2B version is in development.
Ready to skip the guesswork?
Build your own custom wiring diagram in under 10 minutes!
Not ready yet? Download our 92-page eBook and learn the basics first, completely free for a limited time.
Wiring Diagram Software
Your DIY Wiring Shortcut: All essential tools you need in one package:
€282
€49
- Full access to our software (valued at €150)
- Full shopping list with high-quality links (valued at €35)
- Complete eBook (valued at €27)
- Ongoing updates and personal support (valued at €70)
eBook
We cover: batteries, inverters, fuses, solar panels, and wiring basics — perfect if you’re just getting started.
€27
€0
- Understand the basics of electronics: Watts, Amps etc.
- We talk about Energy storage, Energy Usage and Engergy Input
- Calculate the cacacity for your dream trip and more